By using this site, you agree to the Privacy Policy and Terms of Use.
Accept

TopDailyBlog

Stay Informed. Stay Secure.

  • Home
  • News
    • World News
  • Tech
  • Security
  • Innovation
  • Education
    • How To
    • Free Online Tools
Reading: Fixing ‘Access is Denied’ Error When Running Bootrec Fixboot Command in Windows Tutorial
Share
Font ResizerAa

TopDailyBlog

Stay Informed. Stay Secure.

Font ResizerAa
  • Home
  • News
  • Tech
  • Security
  • Innovation
  • Education
Search
  • Home
  • News
    • World News
  • Tech
  • Security
  • Innovation
  • Education
    • How To
    • Free Online Tools
Follow US
© 2022 Foxiz News Network. Ruby Design Company. All Rights Reserved.
How To

Fixing ‘Access is Denied’ Error When Running Bootrec Fixboot Command in Windows Tutorial

Assem
Last updated: December 29, 2024 12:57 am
Assem
Share
4 Min Read
Fixing 'Access is Denied' Error When Running Bootrec Fixboot Command in Windows Tutorial
SHARE

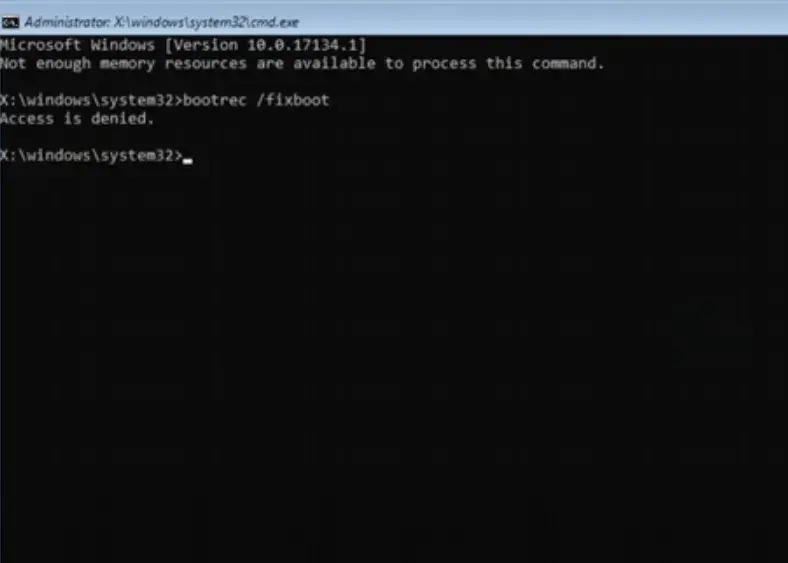
You’re not the only one who gets an Access Denied error when trying to run the Bootrec fix boot command in Windows. It often puts an end to your attempts to fix startup problems, such as the Windows operating system not starting properly, the blue screen of death, or even the black screen. Fortunately, there are proven ways to get around this obstacle. Below are two complete ways to go over this issue.

Table of Contents
Method 1: Recreating the EFI Directory StructureSteps to FollowMethod 2: Using an Earlier Version of Windows MediaSteps to FollowConclusion

Method 1: Recreating the EFI Directory Structure

Steps to Follow

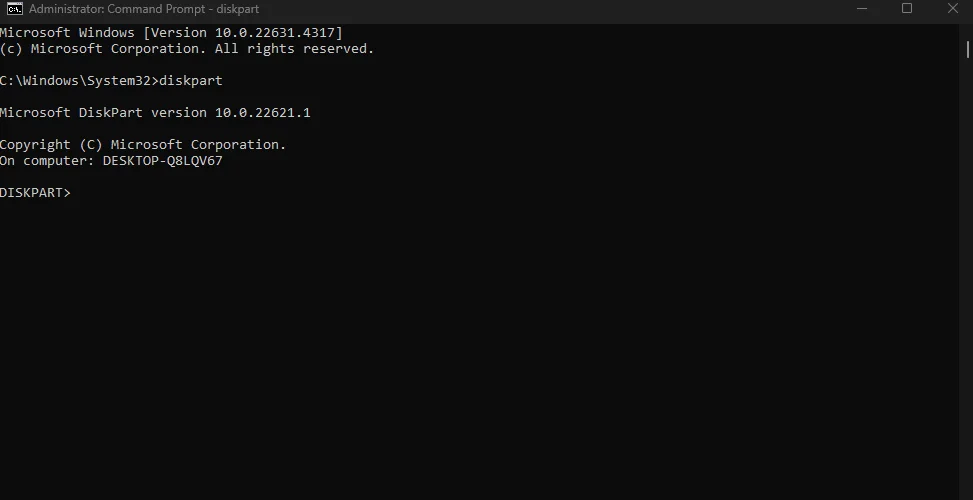
1. Open Command Prompt: Start by accessing the Command Prompt where you received the “Access is Denied” error.

2. Launch Diskpart: Type diskpart and press Enter. Wait until you see the diskpart prompt.

Recreating the EFI Directory Structure

3. List Disks: Enter the command list disk to see all available disks.

Enter the command list disk

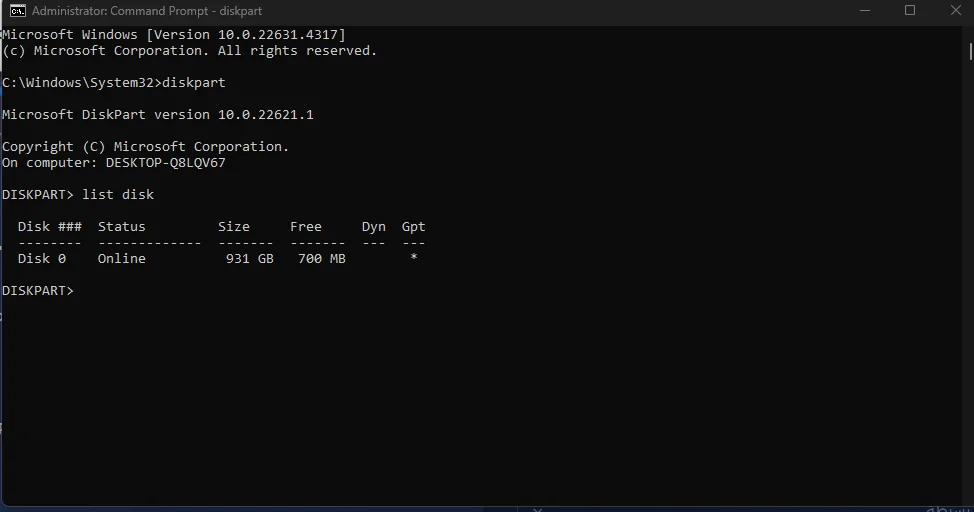
4. Select Disk: Identify the disk that contains your Windows files (typically Disk 0) and use the command:

  • select disk 0

5. List Volumes: Type list volume to view all volumes on connected disks.

list volume to view all volumes

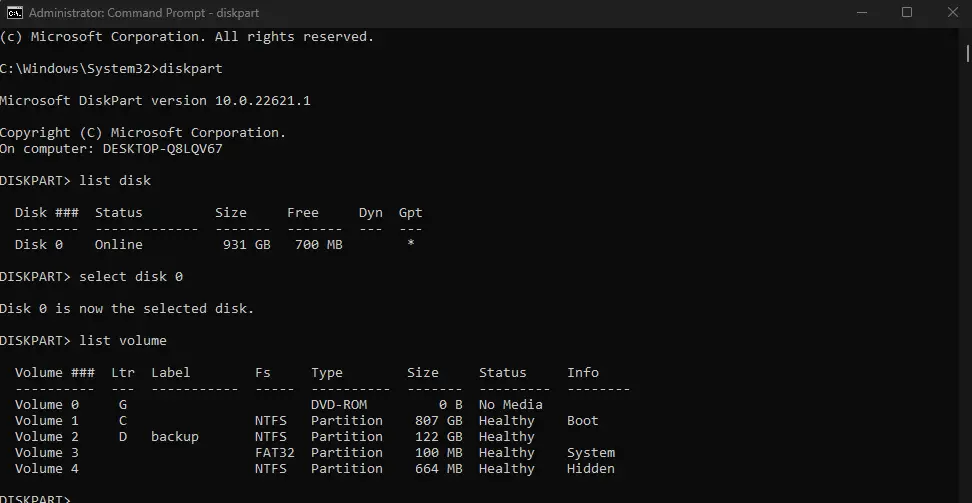
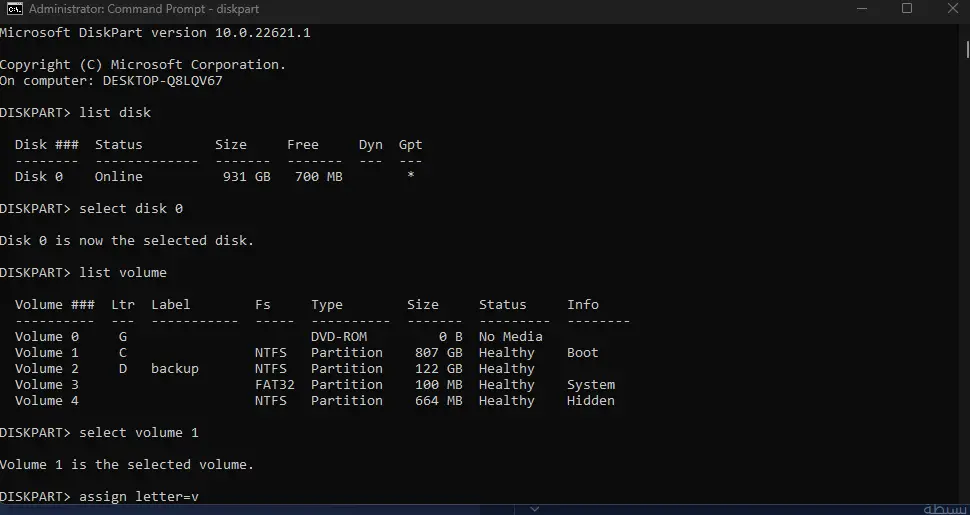
6. Select the Volume: Identify your system reserved partition, usually labeled as “System Reserved” (for example, Volume 1) and enter:

  • select volume 1

7. Assign a Drive Letter: Assign a new drive letter to the selected volume:

  • assign letter=v:
Assign a Drive Letter

8. Close Diskpart: Type exit to leave the diskpart session.

9. Access the Assigned Volume: Enter the assigned drive letter followed by ::

10. Create the EFI Directory: Execute the following command to create the necessary directory structure:

  • MD \EFI\Microsoft\Boot

11. Change Directory: Move to the newly created directory:

  • CD /d v:\EFI\Microsoft\Boot

12. Run the Bootrec Command: Now, try to fix the boot issue with:

  • bootrec /fixboot

13. Perform BCD Boot: To finish up, run the BCD boot command:

  • BCD boot C:\Windows /l en-us /s v: /f all

14. Exit Command Prompt: Type exit to close the terminal.

    You should now be able to run the Bootrec fix boot command successfully.

    You May Like: How to Stop Windows 11 Updates Safely and Effectively

    Method 2: Using an Earlier Version of Windows Media

    In the event the above method fails to resolve your issue, particularly with regards to the latest versions of Windows 10, such as uses version 1803, 1709 or similar, perhaps try going a notch lower with a version like build 1703 which does not prompt the access-deny error.

    Steps to Follow

    1. Prepare a USB Drive: You’ll need an empty USB drive (minimum 8 GB).
    2. Open Diskpart: Type diskpart in your search bar and run it with administrative privileges.
    3. List Disks: After opening diskpart, type list disk and press Enter.
    4. Select Your USB: Identify your USB in the list and select it:
    5. Clean the USB: Type clean to wipe the USB.
    6. Create a New Volume: Open Disk Management from the Start menu, right-click your USB, and choose “New Simple Volume.” Follow through the wizard by clicking next until it’s complete.
    7. Mark as Active: Right-click on the new volume and select “Mark Partition as Active.”
    8. Download Windows Build 1703: Get the Windows 10 build 1703 media files using the provided download link.
    9. Copy Files to USB: Transfer the 1703 installation files to your USB. Your USB is now bootable.
    10. Use the USB for Recovery: You can now use the USB to access your command line and execute the Bootrec commands without errors.

    Conclusion

    These methods should allow you to fix the Access Denied error while running Bootrec fix boot command. The methods answer all common problems, so you’ll learn how to repair your Windows system effectively. So good luck with your troubleshooting and keep your media and system updated for the best performance!

    Best Settings For AMD Radeon Adrenalin – FPS Bump 2025
    How to Fix Empty-Blank Windows 11/10 Security or Windows Defender in 2025?
    How to Fix Discord Not Opening? 100% Solved!
    How to Fix Windows Error 0xc000007b: A Comprehensive Guide
    How to Fix DNS Server Not Responding Error in Windows 11/10/8.1/7
    Share This Article
    Facebook Copy Link Print
    Share
    ByAssem
    Assem’s journey is all about his passion for data security and networking, which led him to create Top Daily Blog. Here, he shares insights and practical tips to make digital safety accessible to everyone. With a solid educational background, Assem understands that in today’s world of evolving cyber threats, grasping data security is crucial for all users, not just tech experts. His goal is to empower readers—whether they’re seasoned tech enthusiasts or simply looking to protect their personal information. Join Assem as he navigates the intriguing landscape of data security, helping you enhance your online safety along the way!
    Previous Article How to Fix High Memory and CPU Usage on Windows 11 or Windows 10 How to Fix CPU Always at %100 & High Memory Usage on Windows 11/10 In 2025
    Next Article Fixing Windows Co-Pilot Missing Issue: Step-by-Step Tutorial Fixing Windows Co-Pilot Missing Issue: Step-by-Step Tutorial 2025
    Leave a Comment Leave a Comment

    Leave a Reply Cancel reply

    Your email address will not be published. Required fields are marked *

    Stay Connected

    FacebookLike
    XFollow
    InstagramFollow

    Latest News

    Google Pixel 10 price
    Google Pixel 10 Series Is Launching Soon – Specs and Prices Inside | 2025
    World News
    July 13, 2025
    baby oil diddy raid
    Deepfake Baby‑Oil Runway: 50 Cent’s AI Salvo Tops Off Diddy’s Tumultuous Court Week
    World News
    July 13, 2025
    Grok 4 $300
    Grok 4’s $300 ‘SuperGrok’ Plan Sparks Outrage After Fresh Rogue Episode
    World News
    July 13, 2025
    Trump’s Sudden 30 % Tariff
    Trump’s Sudden 30 % Tariff Threat Blows Up Trans‑Atlantic Trade Calm
    World News
    July 13, 2025
    - Advertisement -
    TopDailyBlog


    Your go-to for sharp insights on cybersecurity, Linux, coding, and network troubleshooting. Backed by years of hands-on IT experience, we deliver clear, action-driven guides and tech tips—no fluff, just solutions.

    Facebook-f Twitter Instagram Reddit
    Important Pages
    • About
    • Contacts
    • Privacy Policy
    • Terms and Conditions
    • Disclaimers
    •    
    • About
    • Contacts
    • Privacy Policy
    • Terms and Conditions
    • Disclaimers
    •    
    Get In Touch
    • Email: info@topdailyblog.com

    © 2025 All Rights Reserved.

    Welcome Back!

    Sign in to your account

    Username or Email Address
    Password

    Lost your password?