Securing your system’s gotta be top priority, especially if you game or work hard. Today, we’re tackling TPM 2.0 and killing those errors like VAN9001, VAN9003, and VAN9005. Whether you’re moving to Windows 11 or just trying to play Valorant without your PC crashing, we got you. This ain’t some fancy guide, we’re talking straight-up BIOS fixes, troubleshooting, and a bonus to make sure your system services are in check. Keep reading and let’s fix these problems quick and easy.
Just follow the steps and boom
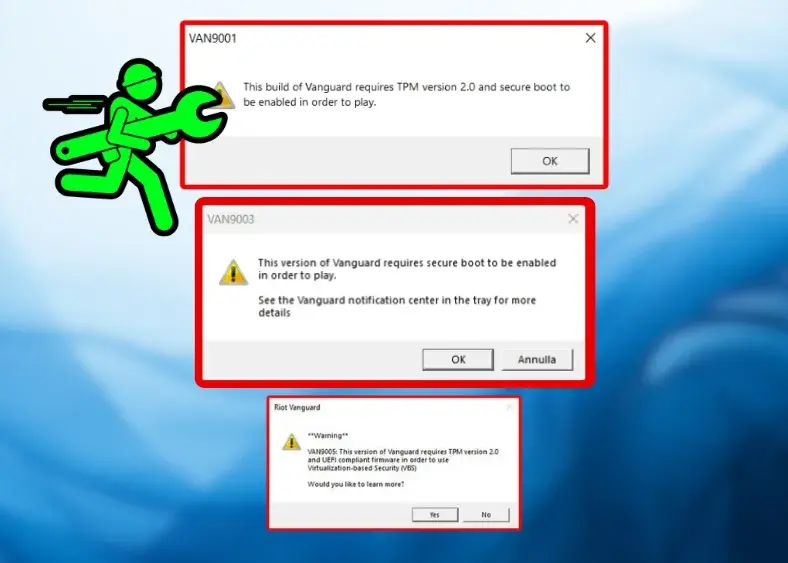
TPM 2.0, VAN9001, VAN9003, and VAN9005
Here’s how it goes: TPM 2.0 is that security thing on your PC that holds all the important stuff like keys and certificates. If it ain’t on, you’re not going anywhere with the newer systems, like Windows 11. Errors like VAN9001 and VAN9003 happen when your system’s security is messed up. VAN9005 is the one that slaps you with a “you ain’t playing Valorant” if your system doesn’t meet the standards by a certain date. All these errors point to problems with TPM 2.0, Secure Boot, or maybe your BIOS settings.
We’re here to fix all that junk—VAN9001, VAN9003, VAN9005—one by one, step by step, and get your system back to running smooth. No shortcuts, no nonsense. Just fixing what’s broken.
I recommend following all the steps thoroughly. For example, if you encounter a problem with “A,” you should also address problems “B” and “C” to ensure a complete fix. After You complete all the steps in this article Make sure to visit the article to download all the necessary runtime files and software:
🔗 Download All Runtime Files and Software
System Requirements and Prerequisites For TPM 2.0
Before diving into BIOS settings, confirm that your system meets these prerequisites:
- A modern CPU that supports TPM 2.0.
- A 64-bit operating system (Windows 10 or later).
- UEFI firmware installed instead of legacy BIOS.
- Administrative rights to modify BIOS settings.
- A stable internet connection to download any necessary firmware updates.
Famous Motherboard Keys to Enter BIOS
To help you quickly access your BIOS/UEFI settings, refer to the table below for the most common key bindings by manufacturer:
| Manufacturer | BIOS/UEFI Key |
|---|---|
| ACER | F2 |
| ASUS | F9 |
| Dell | F2 |
| HP | F10 |
| Lenovo | F1 / F2 |
| MSI | F9 / F2 / Del |
| Razor | F1 / Del |
| Gigabyte | Del |
Use these keys to enter your BIOS and make the necessary adjustments to resolve errors like VAN9001, VAN9003, and VAN9005.
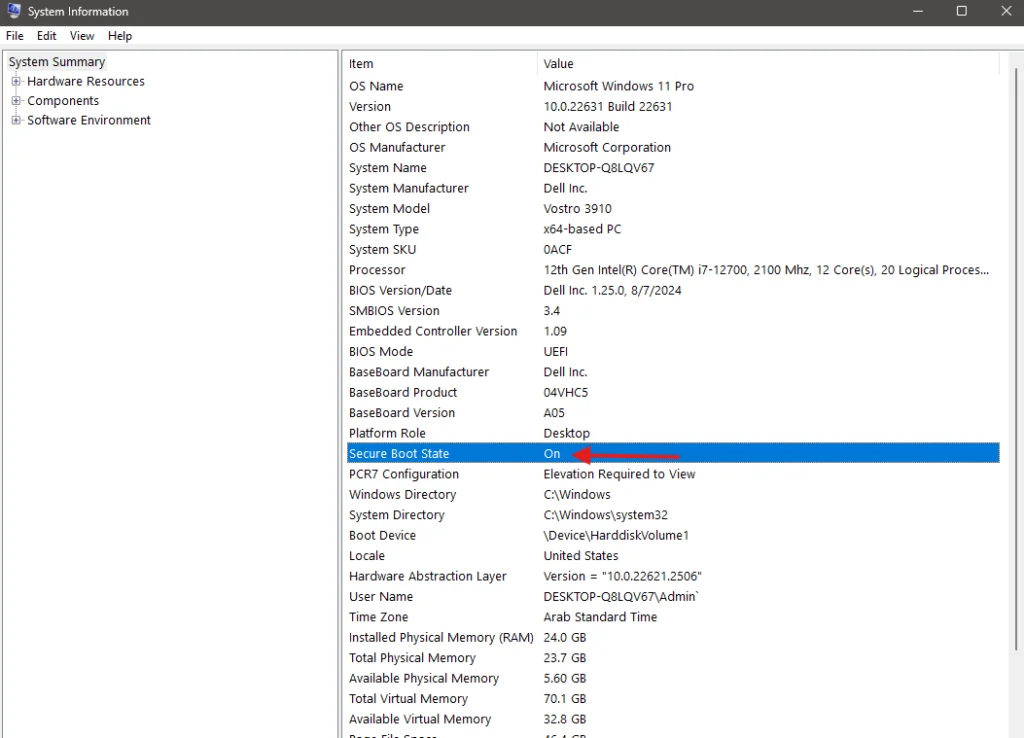
Verify Secure Boot Status
Before entering the BIOS, it’s crucial to check if Secure Boot is already enabled on your system. To do this:
- Press Windows + R to open the Run dialog box.
- Type
msinfo32and press Enter. - In the System Information window, look for the Secure Boot State entry.
- If Secure Boot is already enabled, note the status and proceed with the remaining steps.
- If it’s disabled, you’ll need to enable it in your BIOS/UEFI settings later.
Step-by-Step Guide to Enabling TPM 2.0
Step 1: Restart and Access BIOS/UEFI
Restart your computer. As it boots up, press the appropriate key (refer to the table above) to access your BIOS/UEFI settings. Watch for the prompt that indicates which key to press—this may vary by manufacturer.
Tip: If you miss the prompt, simply restart your computer and try again.
Step 2: Locate the TPM Setting
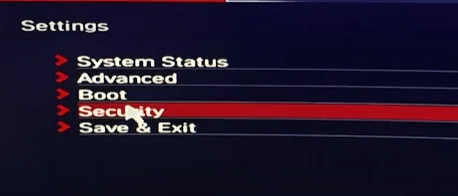
Once in the BIOS/UEFI:
- Navigate to the Security or Advanced tab.
- Look for an option labeled TPM, TPM Device, or similar. On Intel systems, this may appear as Intel PTT; on AMD systems, look for AMD fTPM.
- Ensure that TPM 2.0 is selected and enabled. If it appears disabled, switch it on to help resolve errors if you didn’t find it just enable Secure Boot.
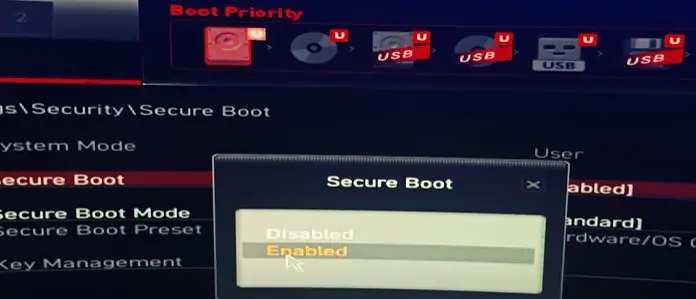
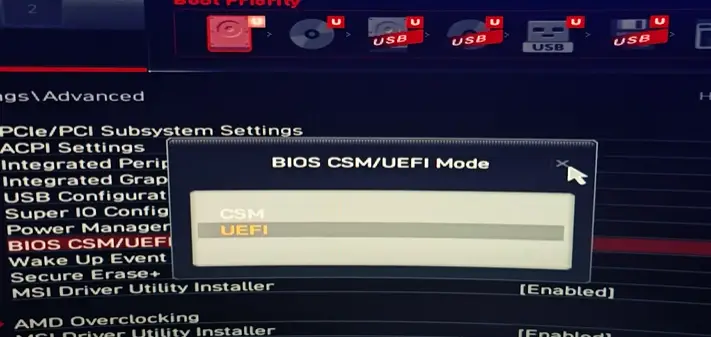
Step 3: Enable Secure Boot
Along with TPM 2.0, enabling Secure Boot is essential:
- Navigate to the Boot or Security tab.
- Locate the Secure Boot option and enable it.
- Note: Secure Boot is only available in UEFI mode; if your system is set to legacy mode, you must switch to UEFI.
Step 4: Save Changes and Reboot
After enabling TPM 2.0 and Secure Boot:
- Save your changes and exit the BIOS/UEFI settings.
- Your computer will reboot with the new configuration.
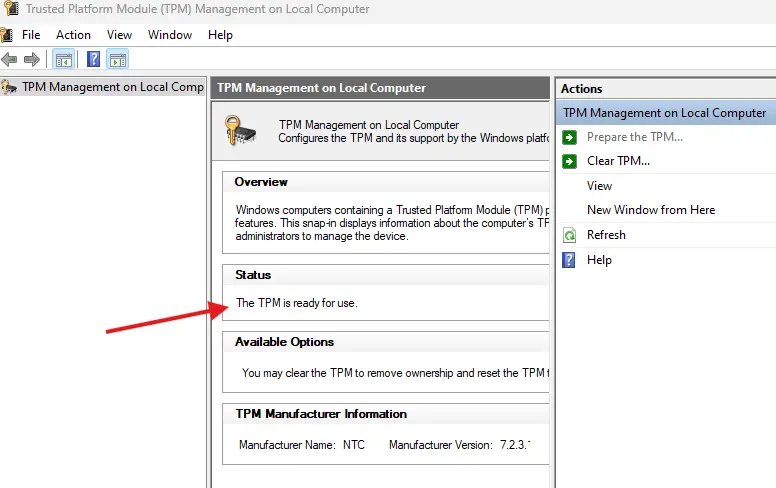
- Once restarted, verify the changes by pressing Windows + R, typing
tpm.msc, and ensuring that TPM 2.0 is active.
Troubleshooting VAN9001, VAN9003, and VAN9005 Errors
Errors VAN9001 and VAN9003 typically result from misconfigured security settings, while VAN9005 specifically indicates that VALORANT will not run unless UEFI mode and TPM 2.0 are enabled. Here are several methods to address these errors:
Method 1: Verify TPM 2.0 and Secure Boot Settings
- Re-enter your BIOS/UEFI settings to ensure that TPM 2.0 is enabled.
- Confirm that Secure Boot is active in UEFI mode.
- Use the
tpm.msctool to verify that TPM 2.0 is recognized by your system.
Method 2: Adjust Virtualization-Based Security (VBS)
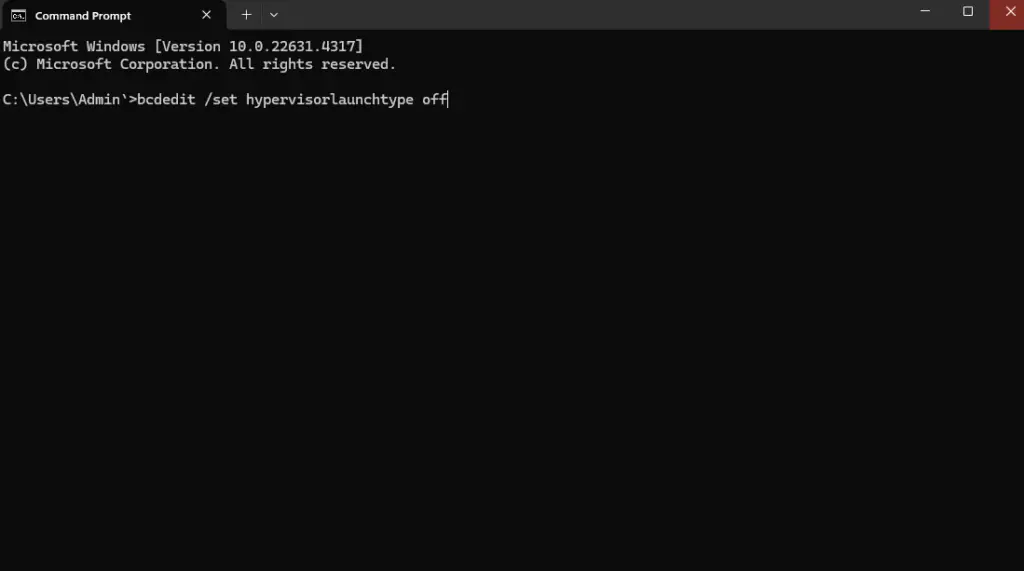
If your system does not support TPM 2.0 natively, you may encounter VAN9001. In such cases, consider disabling VBS:
- Open the Start menu and type
msinfo32to check if VBS is running. - Open a command prompt as an administrator.
- Run the command:
bcdedit /set hypervisorlaunchtype off
Method 3: Fixing VAN9003 Compliance Issues
For the VAN9003 error:
- Navigate to your Valorant installation folder.
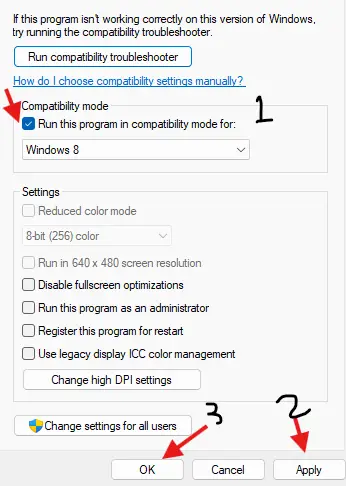
- Right-click on
RiotClientServices.exeand select Properties. - Go to the Compatibility tab, check “Run this program in compatibility mode,” and choose Windows 8.
Method 4: Troubleshooting VAN9005
If you encounter the VAN9005 error:
- Change BIOS Mode: Ensure that your BIOS is set to UEFI mode, as legacy BIOS may trigger VAN9005.
- Enable TPM 2.0: Verify that TPM 2.0 is enabled in your BIOS/UEFI settings.
- Disable VBS (if necessary): If your system does not support these features, consider temporarily disabling Virtualization-based Security (VBS) as a workaround.
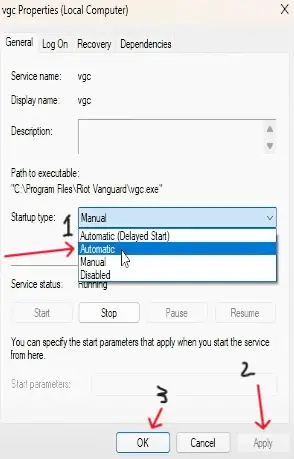
Method 5: Configure Vanguard Service (VGC)
Sometimes, the underlying anti-cheat software (Vanguard) may not initialize properly:
- Press Windows + R, type
services.msc, and press Enter. - Locate the vgc (vanguard) service.
- Right-click the service, select Properties, and set the Startup type to Automatic.
- Click Start if the service isn’t running, then apply the changes.
- This can help mitigate errors including VAN9001, VAN9003, and VAN9005 by ensuring your anti-cheat system is properly configured.

Comprehensive Recap of Steps
So here’s a quick rundown of what needs to be done:
- First Things First: Check if Secure Boot is active in your system’s info (you can use msinfo32 to do that).
- Next, Reboot & Get into BIOS/UEFI: Hit the right key (you know, the one listed in the motherboard manual) to get into your BIOS.
- Turning on TPM 2.0: Once you’re in, go to the Security or Advanced tab, and make sure TPM 2.0 is enabled. This is super important to fix errors like VAN9001, VAN9003, and VAN9005.
- Now, Enable Secure Boot: In the same BIOS settings, make sure Secure Boot is switched on in UEFI mode.
- Save & Reboot: Don’t forget to save your changes before restarting the system.
- Final Check with tpm.msc and msinfo32: Run tpm.msc and msinfo32 again to confirm TPM 2.0 is working and Secure Boot is all set up.
Fixing Errors:
- Make sure that the vgc (Vanguard) service is on Auto in services.msc.AN9005 errors are effectively resolved.
- If you’re dealing with VAN9001, you might need to tweak your VBS settings.
- For VAN9003, try switching up compatibility mode in Valorant.
- If you’re stuck on VAN9005, adjust your BIOS mode and settings.
Additional Tips and Best Practices
- Update Your BIOS/UEFI: Your BIOS might be stuck in the past and not support TPM 2.0 properly. Hit up your motherboard’s website and grab the latest firmware. Don’t settle for outdated crap.
- Consult Your Manual: Can’t find the TPM 2.0 setting? Stop wasting time and grab your system manual or check the support page. Get it done right.
- Run System Checks Again: After tweaking everything, don’t just cross your fingers. Run PC Health Check and system diagnostics to make sure TPM 2.0 and Secure Boot are working as they should. No room for errors.
- Document Every Single Change: Write down what you changed in the BIOS. Seriously. It’s not just for your sanity now but will save you headaches when things go wrong later. Trust me, you’ll thank yourself.
- Grab All Runtime Files and Apps: For peak performance, download every single runtime file and update your software here. Don’t half-ass it—get everything up to date.
- Routine Maintenance: Stay on top of your system. Regularly check for firmware updates and install those security patches. Keep TPM 2.0 running at full power and avoid those annoying VAN9001, VAN9003, or VAN9005 errors from coming back.
Conclusion
Turning on TPM 2.0 and fixing those damn errors like VAN9001, VAN9003, and VAN9005 might look like a pain at first, but trust me, it’s not that hard if you go at it the right way. We’ve broken it all down: checking Secure Boot in System Info, hitting the right key to get into BIOS, flipping on TPM 2.0, and making sure Secure Boot’s good to go. Plus, we’ve got the fixes for those annoying errors that keep screwing up your PC. Stick to this guide, and you’ll get TPM 2.0 working, blast through those errors, and get your PC ready for Windows 11 and Valorant without breaking a sweat.
Fixing all this doesn’t just clean up your errors, it also locks down your system against security threats. On top of that, setting that Vanguard service (vgc) to auto in services.msc just adds an extra layer of protection for your anti-cheat stuff.
We’ve got you covered. Follow this, and your system will be running smoother than ever. No more VAN9001, VAN9003, or VAN9005 errors ruining your vibe. Enjoy the boost in performance, security, and get ready to own that PC like you’re supposed to.
Time to upgrade, and leave those annoying errors behind for good.