Windows Co-Pilot is an assistance service that wants to make the user experience much better by taking help from AI. However, some users may face issues as to why Co-Pilot is not available in their settings. This article will guide you to troubleshooting tips that you can follow to enable Windows Co-Pilot to derive maximum advantage from it.
- Improved model extensions and enhancements.
- A range of black pages on Windows co-pilot.
- Providing additional help to resources via the AI Connector.
- How to contact Windows Co-Pilot for an evaluation.
If you encounter these issues there are a number of methods from which you can choose to activate Windows Co-Pilot and get the most out of being a wonderful feature.
Method 1: Using the Registry Editor
Follow these steps to access the Registry Editor and modify the necessary settings:
Open the Registry Editor
- Type
regeditin the Windows search bar. - Right-click and select “Run as administrator”.

Navigate to the Co-Pilot Settings
- Click and expand
HKEY_CURRENT_USER. - Expand
Software. - Expand
Microsoft. - Expand
Windows. - Expand
CurrentVersion. - Expand
Explorer. - Expand
Advanced.
Location if you just want to copy paste: HKEY_CURRENT_USER\Software\Microsoft\Windows\CurrentVersion\Explorer\Advanced
Create a New DWORD Value
- Right-click in the right pane, select
New, and then click onDWORD (32-bit) Value. - Name the new value
ShowCoPilotButton.

Modify the Value
- Right-click on
ShowCoPilotButtonand selectModify. - Change the Value data to
2.

Restart Your System
- Close the Registry Editor and restart your computer to apply changes.
You May Like: How to Stop Windows 11 Updates Safely and Effectively
Method 2: Using Group Policy Editor
If the first method does not resolve the issue, you can use the Group Policy Editor:
Open Group Policy Editor
- Type
gpedit.mscin the Windows search bar and press Enter.

Navigate to User Configuration
- Click and expand
Administrative Templates. - Expand
User Configuration. - Expand
Windows Components. - Click on
Windows Co-Pilot.
Adjust the Policy
- Find the policy labeled
Turn off Windows Co-Pilot. - Double-click to open it, select
Disabled, and clickApply. - Click
OK.
Restart Your System
- Close the Group Policy Editor and restart your computer.
Method 3: Additional Registry Edits
If you’re still having issues, further adjustments in the Registry might help:
Open the Registry Editor Again
- Type
regeditand run it as administrator as explained before.
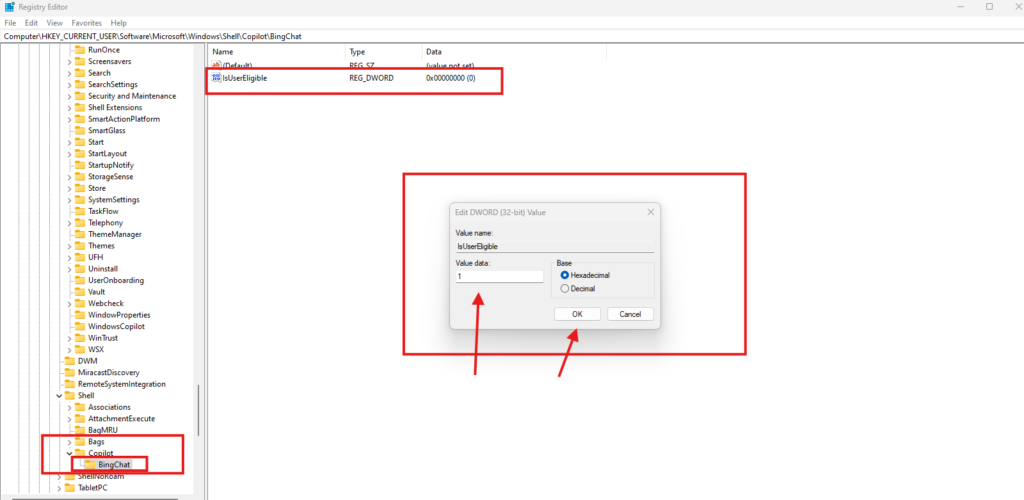
Navigate to Shell Settings
- Expand the following path:
HKEY_CURRENT_USER.Software.Microsoft.Windows.Shell.Co-Pilot.
Again This The Location If You Just Want To Copy Paste: HKEY_CURRENT_USER\Software\Microsoft\Windows\Shell\Copilot
Edit User Eligibility
- Expand the
BingChatkey. - Find the option
IsUserEligibleand double-click it. - Change the Value data to
1.

Restart Your System
- After making the changes, restart your computer one last time.
Conclusion
By following these steps, you should be able to enable Windows Co-Pilot on your device. Don’t forget to restart your system after making changes in the Registry or Group Policy Editor so that the configurations can take effect. If the problem still persists with Windows Co-Pilot, it would be much better to try the Windows updates or refer to Microsoft support resources. Enjoy the advanced performing of Windows Co-Pilot in your computing experience.


