Ever experienced incessant trials of visiting a website or online resource and nothing happens? Your DNS cache might be the culprit. So what’s the DNS cache and how do you flush it for Windows users? Ready to browse smoother and faster? Here we go.
What is DNS Cache?
The DNS cache remembers relevant pieces of information that come from previous requests for a specific DNS lookup. When you type the URL to a website into your computer, it first looks locally for the IP address before searching away. Should it find what it needs, accessing the site is speedier since there is no longer much to do. This process is known as the dns resolver and makes the DNS system to be more efficient.
Also, the Domain Name System (DNS) cache is essential to your web browsing. It is a temporary place containing IP addresses and DNS records related to the websites you open. This cache helps speed the page loading by finding such page information faster in your browser, OS, and ISP..
How DNS Caching Affects Your Browsing
DNS caching does shape your web browsing experience as it stores IP addresses associated with previously visited websites thus speeding up future visits. But, you may need to clear dns cache windows if cache information becomes outdated or wrong. This will keep your browsing and everything really smooth and connected.
Time to Live (TTL) and Cache Updates
Every DNS record in the cache has a Time to Live (TTL) value. This TTL shows how long the record stays valid before needing an update. When TTL expires, the cache removes the record, and a new request is made for the latest info. This keeps the cache fresh and responsive to DNS changes.
Step By Step to Flush DNS on Windows Systems
Clear your Domain Name System (DNS) cache for smooth internet usage. When you encounter slow loading websites or connectivity problems start, flushing the DNS cache can fix the issue. It is especially applicable for users of Windows 10 and Windows 11.
Simply follow the below steps if you want to clear the DNS cache from your Windows computer:
- Click the Start button and select the Command Prompt or Terminal application. Or, press the Windows + R keys and type cmd to open the command prompt.
- If asked, allow the Command Prompt to make changes to your system.
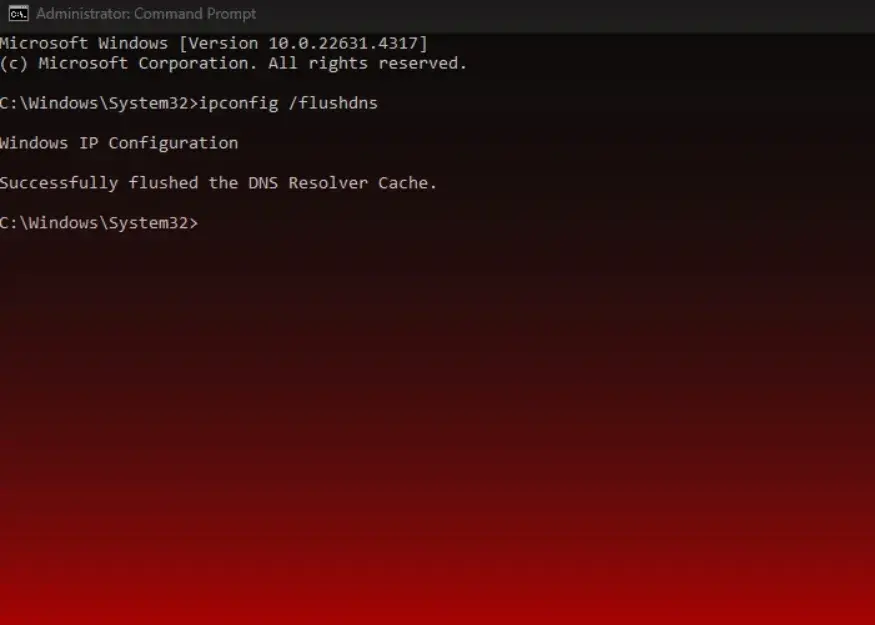
- In the command prompt window, type ipconfig /flushdns and press Enter.
- You’ll see a message saying the DNS Resolver Cache was flushed successfully.

For Windows 7 users, the steps are similar. Start, then All Programs, Accessories, right-click Command Prompt, and choose Run as administrator. Then, follow the same steps as for Windows 10 and 11.
Flushing the DNS cache can fix website loading issues right away. It makes your system get new DNS info from your ISP (Internet service provider) or other DNS servers. This is especially helpful when dealing with DNS propagation, which can take 24-72 hours.
Clearing the DNS cache also boosts privacy and prevents DNS spoofing. DNS spoofing is when bad actors try to send you to fake websites.
| Operating System | DNS Cache Flush Command |
|---|---|
| Windows 10/11 | ipconfig /flushdns |
| Windows 7 | ipconfig /flushdns |
| Mac OS X | sudo killall -HUP mDNSResponder (for OS X Yosemite v10.10.4 or later) |
| Linux | Varies by distribution, consult individual application documentation |
| Google Chrome | chrome://net-internals/#dns |
Windows can bring a solution for many of its internet problems by flushing the DNS cache. Old or bad DNS records are deleted. It can fix issues like making webpages 404 or slow.
It also makes your internet safer from connection to reduce the chances of denial of service from DNS.
It is important to flush your DNS cache regularly, especially after any network changes. So, your system contains the latest network settings.
Knowing how to clear your DNS cache on Windows can make your browsing better. It even makes websites work faster and keeps your Internet connection stable. Learning this trick can really give great relief in future as it saves time and trouble in fixing “Fix dns issues windows” and “Speed up browsing by flushing dns.”
FAQ
Q: What is DNS flushing and why is it important?
A: DNS flushing cleanses your DNS cache. This is quite helpful in circumstances in which you have altered hosting, or where your website loading speed issue persists. DNS privacy is maintained via flushing, and it can also solve certain internet problems and prevent DNS spoofing.
Q: How does DNS caching work and how does it affect browsing?
A: DNS cache stores info from your DNS server. It helps websites load faster by remembering IP addresses. But, it can also store bad info, so flushing it is sometimes needed.
Q: How do I flush the DNS cache on my Windows 10 or 11 computer?
A: To flush DNS on Windows 10 and 11, start by clicking the Start button. Then, select Command Prompt or Terminal. Or, press Windows + R and type ‘cmd’.
If asked, allow Command Prompt to make changes. Type ‘ipconfig /flushdns’ and hit Enter. You’ll see a message saying the DNS Resolver Cache was flushed.
Q: How do I flush the DNS cache on my Windows 7 computer?
A: For Windows 7, just go ahead and click at Start, All Programs, Accessories. When you get to it, right-click on Command Prompt, then click Run as Administrator. Type ‘ipconfig /flushdns’, then hit Enter.
Q: When should I consider flushing my DNS cache?
A: Flushing DNS is helpful for troubleshooting various internet issues, such as slow loading and 404 errors, it is mainly used after changing hosts, or after a new site is created.


